Using closed end pen mandrels to make a closed end pen
Download a printable PDF version of this page HERE
Phil Dart
March 2024
Fountain pen and rollerball pen kits can be made to look a bit different by excluding the finials that you would ordinarily press into position on the nib barrel and on the cap. The result is known as a closed end pen, and it allows the pen turner some extra creative freedom to put his or her own stamp on the overall appearance of the pen.
Instead of drilling all the way through the blank, a carefully measured hole is drilled part-way through, so that the closed end can be turned to an appropriate profile. However, since the blank is closed at one end, pen kit bushes can’t be used in the normal way, it can’t be held on a traditional pen turning mandrel and it can’t be held between centres.
Closed-end pen mandrels are the solution and this brief tutorial will tell you how to use them. It will also give you an insight into the aspects you’ll need to consider in order to successfully turn a closed end pen.
ABOUT THE MANDRELS
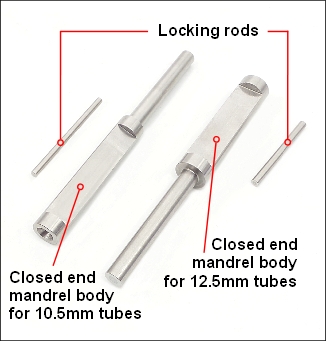
Our closed end pen mandrels are designed to be used with fountain pen and rollerball pen kits that have 10.5mm and 12.5mm tubes. I had our own Cyclone kits in mind when I designed them, but they can also be used with Junior Gents and other Junior style kits, and most other pen kits that use the same diameter tubes.
There are two mandrels in the set - one for the 10.5mm tube and one for the 12.5mm tube.
Each mandrel consists of two parts. The mandrel body itself has a long, thin portion which is held in a drill chuck, together with a fatter part that has a flat surface ground into it on one side. The small, separate rod is a locking rod, which is loose and sits in the flat grove. When the prepared blank is mounted on the mandrel, that small rod will lock up and hold the blank in position.
PREPARING THE BLANKS
The
nib barrel blank should be cut and drilled so that it’s long enough to accept the tube that came with the pen kit, plus some extra length to allow for the need to home an ink converter in the case of a fountain pen, or a refill and spring in the case of a rollerball.
Take your lead from the overall length of the assembled barrel of the kit as if the supplied finial was in place, and then make your blank a bit longer still. The extra length will allow a small amount of room to enable you to trim the blank once the tube is set, and for the wall thickness of your blank at the closed end, which is likely to be thicker than the plated finial supplied with the kit.
If you plan to turn the barrel to a tapered profile, you may have to allow still a bit more length. Always remember that there will be a tube inside, and you can’t taper the outside too much until you’ve got past the tube. Bear in mind though, that the drill bit will have a 135 degree angle at its tip - this is a useful addition to drilling length and can be handy for tucking in the tip of a nib or the end of an ink converter, without necessarily having to extend the hole at its full diameter. Also bear in mind that if you need extra length in the hole beyond the tube, you might prefer to achieve it with a smaller diameter drill if a narrower hole at the closed end helps your intended profile.
The
cap blank should be cut and drilled so that is it long enough to accept the tube that came with the kit, plus some extra to allow for the section and nib (or rollerball tip).
Take your lead from the length of the assembled cap of the kit as if the supplied finial was place, and make your blank a bit longer still. As above, the extra length will allow a small amount of room to enable you to trim the blank once the tube is set, and for the wall thickness of your blank at the closed end. Remember too, the comments above about leaving enough room to form a tapered profile if that is what you plan to do.
GLUING UP
Glue in your tubes according to your normal working practice. Insert them slightly too far so that you have space to trim the blanks once the glue is set. A millimetre or two will be sufficient, but remember not to push them in too far - the tube needs to be flush with the open end on the blank once it’s trimmed, since that’s the end into which you will need to press a component from the pen kit.
MOUNTING ON THE LATHE
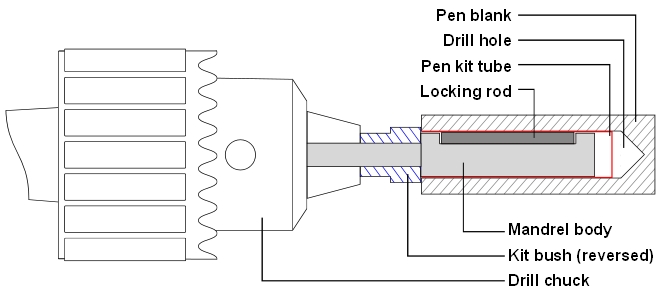
Select the correct mandrel body for the blank (diameter of tube) that you are mounting. The thinner end will be held in a chuck on your lathe, and the fatter end will support the blank. If you use bushes, slide the appropriate one over the thinner end of the mandrel the opposite way to how you would normally mount a pen kit bush - in other words, reverse the bush so that the part that would ordinarily go inside the tube, points towards the lathe, not towards the blank.
Fit a drill chuck into your headstock and tighten it down on the thin end of the mandrel, so that the bush is sandwiched firmly in place. You could instead use a collet chuck or any other type of chuck of your choice, as long as it’s capable of tightening down on the mandrel, which at that end is roughly 6.2mm in diameter.
Identify the correct locking rod for the mandrel you are using. They are different diameters, and it’s important that you use the right one. However, they are also different lengths, and so are the flat ground slots into which they fit, so it’s easy to work out which locking rod is for which mandrel body
Place the locking rod into the flat slot on the mandrel then slide the blank over the whole assembly. By hand, turn the blank slightly away from you (clockwise as you look at the headstock) and the blank will lock in place. You are now ready to switch on the lathe, then turn and finish the blank according to your usual practice.
If you need to run your lathe in reverse for any reason, stop it first and by hand turn, the blank slightly towards. If you don’t, the blank is likely to unlock and come loose.
Lathe running normally - Turn the blank away from you by hand (clockwise) before you start.
Lathe running in reverse - Turn the blank towards you by hand (anti clockwise) before you start.
When you have completed turning and finishing, stop the lathe and twist the blank by hand slightly, to allow the blank to come loose and to be removed. It can now be pressed together, not forgetting that you no longer need the finials at either end of the pen, or the clip.
Hey presto! You have a finished closed end pen.


