Call us: 01363 84686
Account

An introduction to custom pen making


Download a printable PDF version of this article HERE


Phil Dart
August 2020
Hardly a day goes by when I don’t get asked about going kitless, which by the way is a reference to making pens, not about fetishes or the desire to get an all over suntan, so there’s absolutely no need to leave the room. Consequently though, I spend a lot of my time helping people to understand pen design, nibs, threads, materials, and even the principles of a fountain pen, so I thought it was high time that I wrote a more permanent reference, not only, it has to be said, to save me from saying the same thing again and again, but mainly to make it publicly available to anyone who has a stirring interest in making pens from scratch.

This is only an introduction - it’s purpose is to answer some frequently asked questions to help you come to terms with some of the basics you are going to encounter at the start of your journey, but that said, there are a great many makers out there who have gone on to establish sound businesses, some on an international level with an enviable reputation, whom with a previous knowledge of zero, got started by having a conversation with me about exactly the same things that you’re going to read about in a moment or two. Making a pen from first principles can seem like a daunting prospect, particularly if you’re not an engineer or you have no knowledge of fountain pens beyond the one that might be on your desk, or assembling them from kits. It’s true that the learning curve is quite steep in the beginning, but once you have a grasp on a few basic principles, you’ll be able to indulge your imagination and creativity, begin to develop your skills, solve the problems you encounter along the way, so that after maybe a few less than perfect attempts you will have made a pen that you can truly call your very own, because you’ll have built it from scratch.

This article isn’t intended to be an in-depth analysis of design or working methods. I’m not going to tell you to make this part that long or the other part flat or tapered at the back - the whole point about making a kitless pen is that you get to make it look exactly how you want it to. If you’ve made pens from Beaufort Ink pen kits, you’ve already made pens that are how I want them to look, because I design all our pen kits. However, if you’re thinking about going down this particular route, this paper will give you an overview of the things you need to consider before you start to invest in tooling, it will explain why and how some things follow from others, and it will assist in coming up with a design of your own that will work from a technical point of view.

OK - let's get started.
 
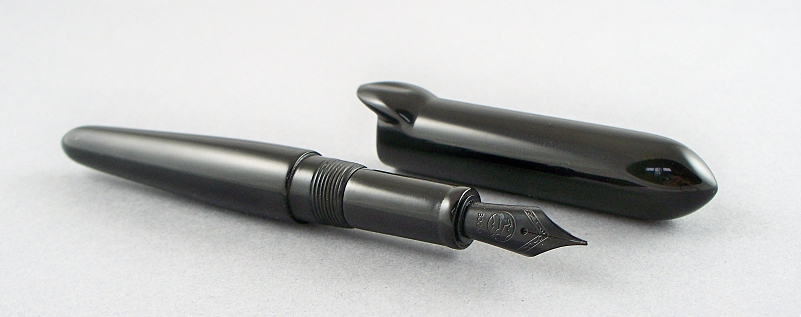
A custom pen by Jake Lazzari - polished black ebonite with Bock size 6 nib


What's in a name?

Let’s get this bit out of the way before I go any further.

So far, I’ve referred to what we’re doing here as making kitless pens, and actually I’ve been careful up to this point to mention the phrase only once. Given that most of us began our journeys by making pens from kits, and huge numbers of us enjoy both kit and kitless making, the term “kitless pens” is useful amongst pen makers as a sort of shorthand way of distinguishing one discipline from another. But, and I emphasise this, it’s a term that is only useful amongst pen makers - I’ve never noticed Parker, Visconti, MontBlanc or any other manufacturer advertising their pens as “kitless” even though they don’t use a kit. You’ll be chasing similar customers if you intend to eventually sell your  pens, so if you start talking about kitless pens to them, be it at a sales venue or online, your potential customers will wonder what on earth you’re going on about - and a good many makers who are already deep inside this particular rabbit hole will sneer at you too.

If we distil down what is we actually are making, it’s a fountain pen that is handmade from first principles. The term “handmade pen” though, is already in common use by many, as a sales term to describe pens made from kits, even though the bulk of the end product was mass-produced and came out of a plastic bag. It is though, a legitimate and perfectly legal description of a pen made from a kit, therefore that label is already taken - which is a shame, because it would otherwise have been ideal.

In increasingly more common use however, are the terms “custom pen” and “bespoke pen”. Customisation and turning to order are part of everyday life for a lot of kit pen turners, so why should those terms be especially appropriate to kitless pens? In my opinion they’re not really very appropriate at all, and I’ve seen many a discussion online on the topic, but short of a better label, that is how many makers now describe what up until now, you have recognised as a kitless pen.

For the purposes of this article, I’ll refer to them as custom pens, and I suggest that you might want to get into the habit of doing the same. If you come up with a better label, do please let me know.


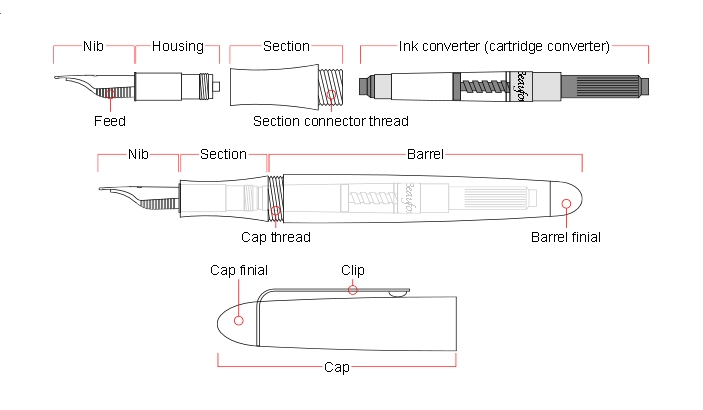
Naming the parts

 
The parts of a fountain pen


  Male & Female Threads  
 

Consider a nut & bolt. The nut has a female thread inside of it, and the bolt has a male thread outside of it. In other words, a male thread screws into a female thread (no giggling in the back row please)

A Tap is used to cut a female thread and a Die is used to cut a male thread


Start from the inside, not the outside

The question I’m asked most often is what the best size of tap & die is for cap threads. Triple lead taps & dies are a lot of money to buy, and given that Beaufort Ink stocks quite a few different sizes, obviously people want to make sure they’re buying the right thing before splashing out. It’s understandable therefore, why the question is so frequently asked.

It would be easy to give a generic answer, but it would only ever be a generalisation because the answer depends on so many other factors. It’s more important that you understand for yourself how to get to the answer.

But to understand that, you first need to take into account that a primary requirement of a fountain pen is the ability to get an ink converter in and out of it, and therefore, before you can begin thinking about cap threads, the design of your fountain pen needs to start with the inside, not the outside.

The ink converter is removed from a fountain pen through the middle of the thread which connects the Barrel to the Section. Assuming that you want to make a decent pen, you’ll want to use decent parts, and the Beaufort Ink Premium Ink Converter is 7.82mm in diameter at its widest point. That means you’ll need a hole through the centre of that thread of at least 8mm, and preferably a bit more.

So, if you read the information box below about majors, minors & pitches, you can establish that the minor of the thread on the Barrel which holds the Section in place, has to be at least 8mm. You can calculate as well, that with a thread of say M9x1, you do indeed end up with minor of 8mm. It will work, but it doesn’t leave a great deal of clearance, so by using a thread with a slightly finer pitch, say M9x0.75 for example, you’ll have a slightly larger minor, in this case,  8.25mm.

These are minimum sizes though - there’s nothing to stop you from using a larger thread altogether. M10x1 will give you a minor of 9mm, but it’s enough for the moment to have gained the understanding. Just bear it in mind for now, as you’ll need to re-visit this aspect once you’ve considered what size of nib you’re going to use - and that’s what comes next.


  Thread Majors, Minors & Pitches  
 

Instead of talking about outside and inside diameters of threads, they are referred to as major and minor diameters.

The major is the outer extreme diameter, which on a male thread would be the crest. The minor is the inner extreme diameter - the trough between the crests if you like, sometimes also called the root, which on a female thread would be the hole through the middle. Imagine a nut and bolt in cross-section, and you’ll see that the major and minor are the same on both.

The pitch is the linear distance between the crests of the thread. A metric thread with a major of 10mm and a pitch of 1mm would be described as M10x1
 
Subtracting the pitch from the major will give you the minor, so an M10x1 thread will have a minor of 9mm. It also tells you the drill size to aim for when using a tap, which will also be 9mm in this example.
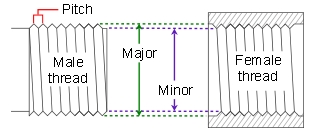
 
Thread majors, minors & pitches


A custom pen by John Sanderson - DiamondCast French Quarter with argentium silver accents and and Bock size 6 nib


Decide on a nib and design your section

The size of nib you opt for is going to impact on the overall design of your pen, quite possibly including the thread size at the back end of the Section that I discussed on the previous page. It’s not important right now to decide on the point width of your nib, since within each physical nib size, it will make no difference to the geometry and design of your pen, and can be decided later. But the physical size of nib will make a difference because their Housings are different dimensions. Apart from anything else, their thread sizes are different too, so you need to decide which size you’re going to use before you invest in thread taps for the inside of your Section.

Without analysing the characteristics and nuances of different nib sizes, it really just boils down to whether you want your custom pen to be thinner or fatter. The larger the nib, by necessity the larger the Section is going to have to be in order to accept the Housing. If the Section is larger, the barrel might need a larger diameter in order for it to look right, and the larger the Barrel, the larger the Cap is going to have to be too. And, dare I say it, the larger the Cap thread.

We have drawings available at Beaufort Ink for all of Bock’s nib housings, and we’ll email to you whichever ones you’d like on request. They show all the relevant dimensions of the housings, and that will enable you to plan the internal and external geometry of your Section.

 
  Nib Sizes  
 

The nib size (size 5, size 6 and so on) refers to the physical size of the nib. The point width (fine, medium etc) refers to the writing width of the nib.

There are three main nib sizes, which amongst fountain pen users, and for making a first custom fountain pen, the most popular are sizes 5 & 6. Sizes are so called because they fit around an ink feed which is 5mm or 6mm in diameter. A size 6 nib is physically larger than a size 5, both in it’s length and it’s width, and it’s housing is therefore larger too.

You can read a more detailed explanation of nibs on the main Beaufort Ink website HERE


A Section for a size 6 nib will possibly require a larger thread to connect it to the Barrel than the minimum sizes I mentioned earlier, but there’s no need to go overboard unless you particularly want a large pen. M10x1 is a typical size for that connection for a size 6. You could use the same thread for a size 5, but given a size 5 can easily result in a more slender pen if you want it to, M9x0.75 is possibly a better choice.

Through the middle of this thread is the hole through which the ink converter is inserted in order to connect it to the ink intake nipple on the bottom of the nib housing. There’s no need to be absolutely precise about the size of this hole, since it isn’t what provides the watertight seal between the housing and the converter - that is already created between the intake nipple and the mouth of the ink converter. However, you do need to provide some support for the ink converter - you don’t really want the ink converter wafting around in fresh air with no support, so your design should aim to allow the ink converter to be pushed in by a few millimetres (roughly up to the back of the metal seal at the converter’s front end) and the hole needs to be just wide enough to accommodate that metal seal. That way, if the ink converter gets inadvertently knocked whilst filling the pen, it won’t matter too much.

 
  Top Tip #1  
 

Take note of the dimension from the underside of the collar at the top of the Housing to the top of it’s thread. Make the corresponding dimension inside your Section marginally longer than that.

If the Housing locates by running out of thread, it is likely to seize up. By making the dimension longer (0.5 to 1mm will do the job) the Housing will locate on it’s collar, which is what it’s supposed to do.


As well as your connector thread, you’re going to have to re-visit your Section design too, because a well planned pen should flow from its Section into the Barrel, without too much of a step up to the Cap thread, and we still haven’t got to a point where the size of the Cap thread can be decided. A big step up from the Section to the Barrel is one of the three big deal breakers for a great many fountain pen enthusiasts when looking for a new pen. You’ll come across the other two as you read on

You can begin to see I hope, that no single part can be designed in isolation. You have to think it through and get to an approximation, keep the information in mind whilst you think through the next part, which may well then require backtracking to the previous one in order to fine tune it - all parts of the pen need to be compatible, both technically and aesthetically. You then move on to the third element, which could easily involve some tweaks to the second, and therefore the first. And so it goes on. The third element though is the Barrel, and that’s what I’m going to discuss next.


  Ink Converter Fittings  
 

Unless a particular pen manufacturer uses a specific geometry for the mouth of their ink cartridges and ink converters (some do - Parker is a classic example) they generally all have a mouth that is known as a standard international fitting, which is pretty much universal.

Beaufort Ink fountain pen cartridges and ink converters are all standard international, and Bock nibs are designed to take a standard international fitting, so the eventual owners of your custom pens will be able to get cartridges or a new converter anywhere.

Beware though, that cheap Chinese versions are not as standard as you might hope, so if you use a cheap converter in your pen, it will probably just fall off. They fit well on cheap Chinese nib housings, but on very little else.


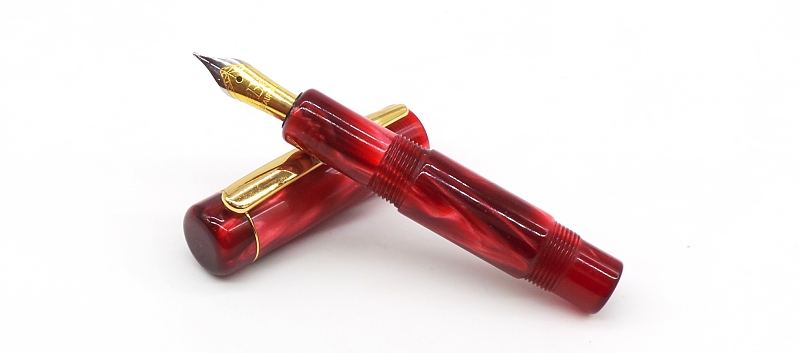
A custom pocket pen by John Garnham - Kirinite Rioja Pearl with Beaufort size 5 nib


Getting to grips with the barrel

The thread I first talked about at the very start, which connects the Section to the Barrel, is probably going to have the cap thread sitting more or less right over it. You roughly know the major of that thread even though you might still want to review it, but to give it some support, you have to allow for a wall on the outside of that thread which will separate it from the cap thread.

If you haven’t already considered what material you’re going to make your pen from, now is the time to decide. Different materials have different strengths - a Barrel turned from aluminium for instance, can be made thinner than one turned from acrylic. Ebonite will be different again, as will brass, and if you’re going to use wood, you might find you need to sleeve the wood in order to get a thread into it at all, but I’ll discuss wood a bit later.

I’m going to assume though that you’re using acrylic, which is where most people start because it’s accessible, often inexpensive, fairly easy to work,  and available in a seemingly infinite range of colours and patterns. Avoid polyester though - it’s too brittle and won’t hold a thread properly. Polyester threads will chip in not much time.

 
  Filling a Fountain Pen with Ink  
 

You can choose to use either ink cartridges or bottled ink in your pen. Cartridges are quick and easy, since you just unscrew the Section from the Barrel, remove the empty cartridge and fit a new one. A Cartridge has a seal across its mouth, which is broken by the intake nipple of the nib housing when the cartridge is pushed on. Cartridges are ideal for the occasional pen user or for a quick fill with no hassle or fuss.

Most fountain pen users though prefer to use bottled ink, firstly because millilitre for millilitre it’s much cheaper than cartridges, and secondly because it’s available in a vastly bigger range of colours than in cartridge form. One of the joys of using a fountain pen is that you can write in any colour you fancy, and a great many pen owners like to take full advantage of that.

Filling a pen from a bottle involves an ink converter, which has a piston inside it that in most cases is operated by a twist mechanism. Unscrew the Section from the Barrel to withdraw the converter from the pen, but leave the converter attached to the nib housing (which is obviously still inside the Section).

Twist the mechanism so that the piston is extended down to the nib end. Dip the entire nib into the bottled ink and reverse the piston to suck up the ink into the converter through the nib - you’ll need to clean up the nib afterwards a wee bit with some tissue or blotting paper. Refit the section to the Barrel, and you’re good to go.

Leaving the converter attached has two advantages - firstly, you are not wearing out the mouth of the converter by constantly removing and refitting it, and secondly, you are excluding air from the ink system by sucking ink in through the nib.


With acrylic in mind then, here’s an important point.

You need to allow for about 1mm of solid material between the Major of your Connector thread and the minor of your Cap thread, in order to separate the two threads and to give the area structural integrity.

So there is a bit of a eureka moment - the size of your connector thread, plus the thickness of the separation between it and the cap thread, gives you the minimum size of the Minor of your cap thread.

I’ll explain that using an example though. Let’s say you’ve decided to use a connection thread of M9x0.75  You’ve got to allow for a thickness all round of about 1mm. That is 1mm added to the radius though, so in fact that adds 2mm to the overall diameter, which gets you to 11mm. In this example then, 11mm represents the absolute minimum size of the minor diameter of the thread you can use for the cap. Refer back to Majors Minors & Pitches and you’ll see that if you choose a cap thread of say M12x0.8, that will result in a minor of 11.2mm, which in fact leaves you with a separation of 1.1mm all round.

Perfect!

Hallelujah - we’ve got a cap thread size, and I hope you can see how we’ve finally arrived there. Read Top Tip #2 below, and you’ll see that the tenon, onto which you’re going to cut the Cap thread, and into which you're going to cut the Section connector thread, needs to be sized to 12mm for the above example (or just slightly less in fact).

 
  Top Tip #2  
 

In order to cut a male thread with a die, the major of the thread is theoretically also how big you need to make your tenon. However, if you make your tenon smaller by a tiny amount, you’ll find it much easier to start the cut, you’re less likely to tear the material as you cut it, and you’ll get a nice “sliding fit” when screwed on to the corresponding female thread. 0.05mm to 0.1mm is enough to make a difference.

NASA might possibly disagree from a precision point of view, but you’re not making space rockets from high tech alloys,  you’re making pens - from acrylic.


The 1mm separation I’ve suggested is only a guide. It’s a good guide, but a tiny bit less won’t hurt, and clearly a bit more won’t hurt either. However, too thin and there is a real danger that the area will be too weak, and could easily snap. I’ve been talking about M9x0.75 and M10x1 as if they are some sort of standard sizes. Indeed they are fairly standard, and they’re also amongst the sizes of taps and dies that are available on the Beaufort Ink website. But as I said right at the start, this is your pen, not mine, so you can use what ever size of thread suits your design, just as long as you bear in mind both of the key points I’ve discussed so far - the need to get an ink converter in and out, and the need for structural integrity at the area that you’re threading.

Coincidentally, as if to illustrate that, I’ve just taken a call from a particular customer about this very point, just as I’m writing about it. He uses an imperial 3/8x24tpi for his Section connector. Imperial threads are denoted by their major (3/8 of an inch) and by the number of teeth per inch (24tpi). He uses M12x0.8 for his cap thread which gives him a separation of just over 0.8mm. It works - I know because I’ve got one of his pens on my desk, which sees at least a bit of action most days.

Can you still use an M12x0.8 cap thread if you choose a connector thread of say M10x1?

Hmmm. That will give a separation between the two threads of only 0.6mm. It will possibly work on some acrylics, it will definitely work on metals, and it will probably fail on ebonite. You might be better off using M13x0.8. That and M12x0.8 are the two most popular sizes. It’s completely your choice though.

The inside of your Barrel obviously needs to be long enough to take an ink converter without it hitting the end. The appearance of the closed end of your barrel though, offers quite a bit of opportunity to flourish your design skills - you might decide to have a one-piece barrel with a simple closed end which is either rounded or squared off, or you might decide to put a finial there that’s made from something to contrast with, or to compliment the main part of the Barrel.

Making a finial needn’t be complicated - in its simplest form, all you need to do is have a tenon on it that can be glued into the barrel. A better, perhaps more professional solution though, would be to do it the other way round and make the tenon on the barrel, which can be glued into the finial. That would leave more space for the converter inside the barrel too.  Even better still, after you get into custom pen making a bit more, you might decide to cut a thread on that tenon and a corresponding one inside the finial, so that the finial screws on instead of being glued on. It’s a nice touch that can add value to your pen. Don’t forget too that if you go down the finial route, you can easily add a decorative accent ring of some sort at the joint between it and the barrel.
 
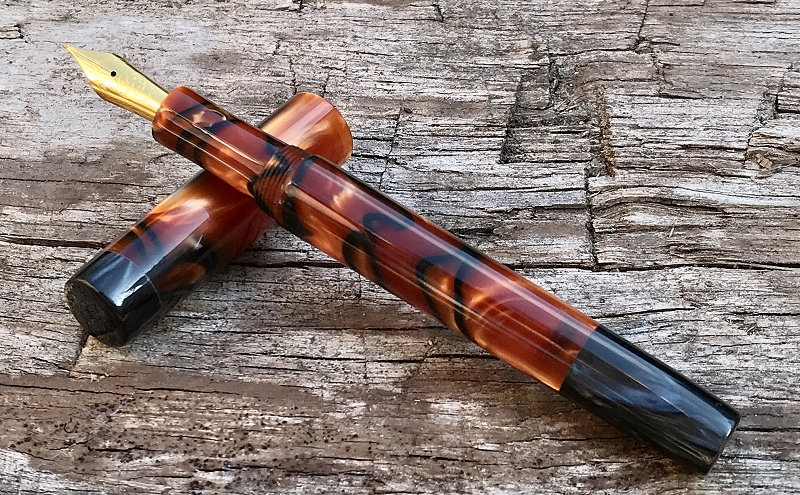
A custom pen by Ashley Lawrence - Kirinite Root Beer with Kirinite Black Pearl finials and Bock size 5 nib


  Types of Thread Tap  
 

There are three main types of tap. The underlying tool is the same thing in each case, but some of the cutters are ground away in certain ways to enable them to perform different functions. Confusingly though, they’re known by different names in different countries.


1. UK = Starter Tap (US = Taper Tap)
Starter thread tap (in the USA it's called a Taper tap)
A Starter Tap has the first 6 or so cutters ground away to a taper. This makes it easier to insert the tap and begin the cut.


2. UK = Intermediate Tap (US = Plug Tap)
Intermediate thread tap (in the USA it's called a Plug Tap)
An Intermediate Tap also has tapered cutters, but only about 3 or so. It can be used to begin a cut if you have the confidence to do so, but its main purpose is to continue the cut begun by the Starter Tap, so that it’s quickly widened to the full diameter of the thread.


3. UK = Plug Tap (US = Bottoming Tap)
Plug therad tap (in the USA it's called a Bottoming Tap)
A Plug Tap is primarily for tapping into a blind hole - a hole previously begun with one of the taps above, where the exit is narrower than the entrance or where there’s no exit at all. All of its cutters are intact and it has a flat end, therefore the tap goes right up to the end of the hole at the full diameter of the thread. It isn’t suitable for beginning a cut, but it is useful for continuing a cut in translucent or transparent material, where you’ll see the thread from the outside. In such cases, it’s desirable to have a clean finish to the thread rather than appear to just peter out, which is the effect you’d see with either of the other two types above.


  Understanding Thread Dies  
 

The two common styles of die are solid and split dies. Solid ones are much cheaper but they have limited uses. They’re difficult to get started, and are much better at chasing an existing thread than they are at cutting a new one. A split die, by contrast, can be used to perform all of the male thread equivalent functions of the three taps above.

Spilt dies are sliced from the centre to the outside edge, and are then tensioned with a small screw, either on the die holder or on the die itself, which allows you to alter the diameter of the cutters. Tighten it to expand the cutters, and with the lettering on the die facing the workpiece, you have a Starter die -  the first cutters on the lettered side are chamfered.

Slacken the screw  to restore the cutters to their true diameter, and with the lettering facing the workpiece, you have an intermediate die.

Reverse the die so the lettering faces away from the workpiece. The cutters aren’t chamfered on this side so you can now cut at the full diameter of the thread right up to the shoulder of a tenon, just as a Plug tap gets to the end of a blind hole.
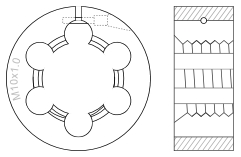
A split thread die is used for cutting male threads and can perform all the equivalent functions of a set of three thread tapscan perform all the functions


And so, to the cap

Now that you’ve got a pretty good idea of what the rest of your pen is going to look like and how big or small it’s going to be, you can turn your attention  to the cap.

The minimum diameter of your cap is going to be dictated by the size of the cap thread you’ve opted for. The need for structural integrity applies as much to the cap as it does to all the other parts, so bear that in mind when you decide how thick to make the cap wall, particularly where the cap thread is cut into it. Refer back to the previous discussion about barrels and you’ll see that again, with acrylic, about 1mm all round the major, give or take a wee bit, should be enough to do the job.

 
  Single Lead versus Triple lead Threads  
 

Try to screw a normal, everyday nut and bolt together, and you can only start to do so when the lead (or start) of the nut thread engages with the lead of the bolt thread. There is only 1 lead on each, which is known as a single lead thread - you can only connect the nut and bolt in one position.

A triple lead thread has 3 leads on both the male and the female, therefore you can connect them together in any one of 3 positions, which are equally spaced around the circumference.

The burden of finding a starting point (if it is a burden) is obviously reduced by a factor of 3, but that’s not the main point. The major advantage of a triple lead thread is that it will screw on the same linear distance as a single lead thread with 3 times fewer turns, whilst the rules of thumb regarding majors, minors and pitches remain unaffected.


Pen owners don’t want to spend ages getting the cap off, they want to be able to remove it and refit it again with as few turns as possible. If you’ve read the blue information box about single vs triple lead threads, you’ll see that a triple lead thread is the solution - they do the same job as a single lead thread with 3 times fewer turns. That is seen as highly desirable by pen owners, or to put it another way, a single lead thread on a cap is the second of the three big deal breakers for a great many fountain pen enthusiasts when looking for a new pen.

A single lead thread with a pitch of 0.8mm will take 10 full turns to travel a linear distance of 8mm - it travels by 0.8mm for every full turn. That's a lot of turns for a fountain pen cap! A triple lead thread with the same pitch will take just over 3 full turns to travel the same linear distance - it travels 2.4mm  for every full turn. If you do the maths and make your cap thread 7.8mm long it will take exactly 3 turns. I’m not saying that you should make your cap thread 7.8mm long, although it’s not a bad starting point, but I am pointing out that if grain or pattern alignment is important to your design, you need to know how many turns it will take to screw on the cap. Make it 6mm long for instance and it will take  2.5 turns, 4.8mm will take 2 turns, and so on. A cap thread that’s too short though, will be prone to unscrewing itself in a pocket, so just bear that in mind too.

 
  Top Tip #3  
 

The cutters on taps and dies are not continuous - there are several sections separated by grooves, (or circles in the case of a die), that are called flutes. Their job is to provide clearance for the swarf - the material being removed by the cutters, so it can be kept clear of the cutters and be pushed to the top of the hole, or the end of the tenon in the case of a die.

The swarf needs to be detached from the hole or tenon though, otherwise the tool will clog up, so the standard technique when cutting any thread, be it male or female, is to make a couple of half turns forward with the tool, then make a half turn in reverse. That will detach the swarf and also help to break it up a bit. Two more half turns forward, then a half turn in reverse, and so on, repeatedly, all the way to the end of the cut.


If you haven’t already decided if you’re going to include a pocket clip, now is the time to do so. Modern, non-traditional designs of pen can sometimes (but not always) look incongruous with the addition of a clip, but by the same token, more often than not a traditional design, in my opinion looks incomplete without one. If you are going to add a clip, you need to consider if you’re going to make it yourself or if you’re going to buy one in. Without a fairly high level of metalcraft skills, a homemade clip can look decidedly amateurish, which is why most makers buy them - there is a large selection of pen clips for custom pens on the Beaufort Ink website from which to choose.

Assuming that you’re buying a clip, they come with a choice of gasket sizes - the gasket being the ring that fixes the clip to the cap. Once you have an idea of the diameter of your cap you’ll be able to choose a clip design that has a gasket diameter to match. You might have to tweak the cap diameter a tiny bit given that you’ll be selecting a gasket diameter from a pre-determined range.

Fitting the clip is straightforward. There are other ways but the simplest is by means of a finial and tenon - exactly the same principle that I talked about in the previous discussion about barrels.

Make a finial and slip the clip gasket over the tenon that is going to hold the finial in place. The gasket is sandwiched in the joint between the finial and the main part of the cap, and therefore held securely in place. Again, it’s a nice touch and a point of added value if that tenon is threaded, but it doesn’t have to be. Alternatively, although perhaps not the best path to follow for your first pen, it’s possible to use a gasket size that is considerably smaller than the diameter of your cap. That allows you to hide the gasket inside the joint between finial and cap. A small “letterbox” slit is cut into the area of that joint to allow the horizontal arm of the clip to exit. To do it that way is purely an aesthetic choice though - it doesn’t affect the functionality of the clip or the pen.

Make sure that the space inside your cap is long enough to accommodate the nib when the cap is screwed fully on, and in designing the overall appearance of your pen, it’s a good idea to give a thought to the aesthetic relationship between the length of your barrel and the length of your cap. A cap that’s too long or too short in relation to the barrel can make the pen look odd, unbalanced and frankly unappealing. If your cap looks a bit too long, and you really can't make it any shorter for technical reasons, don’t forget that you can always increase the length of your barrel to compensate, and vice versa. Remember above all else though, that the pen has to be large enough to physically hold, but not so big as to be cumbersome. It also has to feel good in the hand - a cumbersome or badly balanced pen is the third of the three big deal breakers amongst people looking for a new fountain pen.


A few thoughts on working with wood

There are plenty of people who much prefer to work with wood than they do metals or synthetics, and it’s fair to say that a well made pen in an attractive wood always commands quite a bit of attention too, both amongst potential customers and fellow makers alike. Making a pen entirely from wood though, brings with it its own set of problems, which need to be overcome if the pen is going to stand any chance of success in the workshop and have a trouble free existence afterwards.

Some woods are better at holding a thread than others, but we’re not talking about large diameter, coarse threads that you might use on the lid of a turned box for instance, we’re talking about small diameter, fine threads, which are a completely different matter. As far as your barrel and cap are concerned, it can be overcome though, and there are plenty of makers around who will attest to that.

The wood you use for your barrel will need to be stabilised. I don’t necessarily mean stabilised with a proprietary stabilising fluid, which will involve you in chemical mixing, vacuum chambers, temperature controlled ovens and all the rest of it. You might already be geared up for that sort of thing or it might be something you want to get in to, but if not, you can do a good job of stabilising the areas on the barrel and cap that you need to thread by drenching the wood in cyanoacrylate glue, which woodturners and pen makers know better as CA. I’m duty bound to say, if you don’t have any experience of using CA, which I’m sure you probably do, that it can be pretty nasty stuff if it gets on your skin, or the fumes get up your nose or in your eyes, so for goodness sake, as with all things workshop and turning related, wear the appropriate PPE.
 
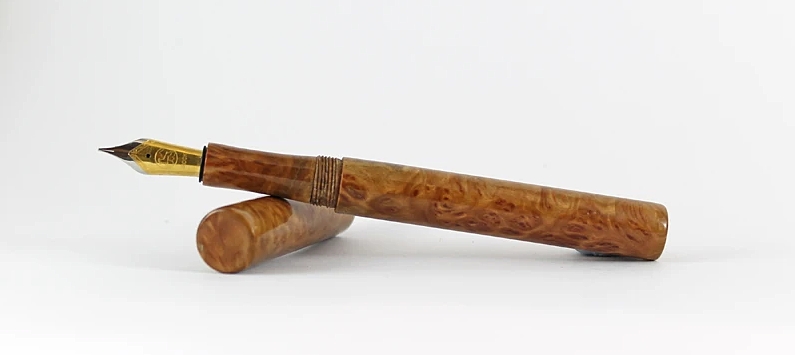
Wooden custom fountain pen by Brad Herrington - made from Silver Gimlet with Bock size 6 nib
A wooden custom pen by Brad Herrington - made from Silver Gimlet with sleeved section and Bock size 6 nib

Assuming that the wood wasn’t too soft or ill suited to the purpose in the first place, once your CA is applied, which you might have to repeat a few times depending on the wood, you can usually get a thread onto it. It’s a good idea to treat the threads to a final coating of CA once they’re formed, which will go some way in helping to prevent them from chipping. You might need to chase them with the tap or the die afterwards, just to clean them up. The guidance I gave you earlier relating to wall thicknesses and thread separations might now have to now go out the window I’m afraid, along with some of the thoughts you’ve undoubtedly galvanised by now about thread sizes. All woods are different, and although you should use the principles I’ve previously discussed as guidance, you’ll have to assess for yourself what sort of sizes you can and can’t get away with, which could well be different for different woods.

What you’re going to find more or less impossible though, is cutting the thread on the inside of a Section directly into wood, and putting a connector thread on the end of it that won’t break. My advice is to not waste your time even trying - the solution here is to make a Section Sleeve out of a material that’s stronger and more suited to the purpose - steel, aluminium or ebonite for instance. The inside of the sleeve can be made in the same way you’d make an acrylic Section, as can the connector thread on the end of it (yes, you’ll need to put the connector thread on the sleeve). Once that’s done you can turn down the wall to something really quite thin - the structural integrity of the sleeve is gained by the combination of it and the section itself, since the next step is to drill out the wood for your Section and glue in the sleeve. All you then have to do is shape and finish the outside of the wood, which when screwed into the barrel is, hey presto, a wooden Section.

 
  Top Tip #4  
 

A thread that locates (or comes to a stop) by butting up to the shoulder on the tenon of another, is prone to seizing up if the thread on both parts runs right up to the shoulder.

You can overcome this by cutting a fillet at the back end of the thread on the male, after you’ve finished forming the thread itself. Use a thin parting tool to remove the threads over a distance of 1mm to 2mm or so, down to the diameter of the minor, or slightly slimmer in fact, and that will stop the problem from happening.

If you also cut a fillet at the front end, it will save you from having to cut one inside the female, should there be a shoulder in there that’s likely to cause a problem.

Fillets at both ends also serve to produce a nice, neat, professional appearance to the thread.
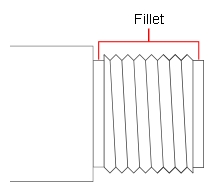
 
Fillets at the ends of a thread produce a nice neat fisnish and stop it from seising up


So that’s the threading taken care of, but there’s something of a bear trap hiding in there I’m afraid. Wood is made up of grains and fibres which together exert stresses on one another, that are released and altered by drilling a hole through the middle. It might not make an appreciable difference visually in a hole a few millimetres wide, but there is a greater chance than not that the hole you drill today will no longer be completely round tomorrow. You can probably still push the same drill bit in there again, albeit with perhaps the tiniest bit of resistance, but by the time you have a thread inside that needs to marry with a corresponding thread elsewhere, which theoretically at least, are both cut to pretty fine tolerances, an out of round hole could seem far worse than barely appreciable to the eye.

A thread on a pen that chafes as you twist it, however slightly, or that risks doing so in the future if the weather changes, is to say the least, very annoying. You can re-drill the holes after 24 hours and that will certainly help to overcome the problem to a certain extent, but it won’t mitigate against atmospheric changes. You’ll only ever overcome that if you can completely seal the wood, inside and out, or if you completely stabilise it though and through. Alternatively, you could sleeve all the threads, not just those on the Section, which is the path advocated by a lot of makers of wooden custom pens.

Wood is a natural material which by its very nature is prone to change - it’s a nuisance, but is paradoxically one of its great charms. I know makers who stabilise the wood and make them more or less as I’ve described above, and I also know makers who wouldn’t dream of selling them without sleeving every single thread on it.

You decide.


How far do you go?

One of the advantages of making a custom pen is that it gives you the freedom to design it exactly the way you want it to look. In order to gain complete freedom though, with the exception of the nib assembly and the ink converter, you’ll obviously need to be able to make all of the parts yourself. That might well be the route you wish to go down right from the word go, or alternatively, either to begin with in order to gain some experience, or even long term as a means to an end, you might prefer to make some of the parts yourself and buy in others in a ready made form.

Sad to say, but there are makers out there who will readily turn their nose up at a pen if anything about it, apart from the nib assembly and the ink converter wasn’t made from first principles. They tend to be people who’ve forgotten that they too started their journey with zero experience, and are the equivalent of ex-smokers being the most ferocious about quitting. Fortunately though, most makers are realistic and nothing short of encouraging and helpful, so don’t allow yourself to be intimidated by the perception of a minority that it’s cheating if you buy some of the parts. It’s not cheating, it’s a means to an end - an end that you reach in your own way.  It’s your pen that you’re making, not theirs. It’s your hobby, your money, your time, your enjoyment and your sense of fulfilment, so don’t let anyone influence how you go about it through snobbery. There are no pen police out there!

It’s possible to buy ready made Sections for instance. They’re available on the Beaufort Ink website, with a connector thread already on the back, and pre-threaded internally to take either Bock size 5 or Bock size 6 nib housings. We have one customer in particular, who bases his whole range of (I have to say, premium priced) custom pens around a size 6 ready made Section, and uses bespoke blanks that we have specially cast for him. His pens are very modern looking and he’s very successful. He sells to customers who would be classed as affluent, at prices that most people would consider to be aspirational, but he certainly doesn’t regard his use of ready made Sections as cheating - he regards it as sound business sense.
 
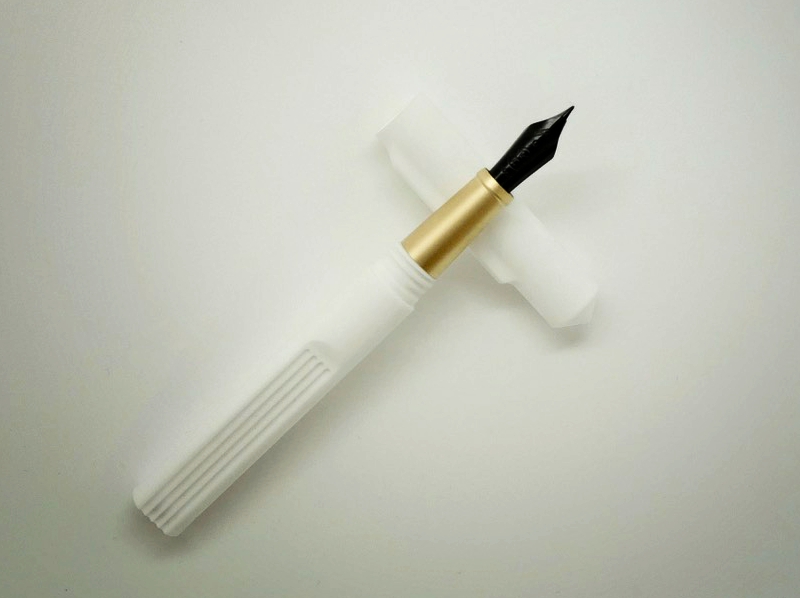
Fountain pen by Giles Ellis - Snow White Semplicita SHDC with ready made Bock section in satin gold and Bock size 6 nib
A custom pen by Giles Ellis - Snow White Semplicita SHDC with ready made Bock section in satin gold and Bock size 6 nib

By the same token, you can buy ready made Section Sleeves on the Beaufort Ink website. They remove the need to create the inside of a Section or the connector thread on the back. You still get to create the outside though, by gluing the sleeve inside your blank and turning the blank to shape. We make them available with wooden Sections in mind because threading the inside of a wooden Section is next to impossible, but they’re useful for other materials too. Again though, it’s not cheating, it’s a means to an end if that’s what you want to do, and we have many, extremely experienced customers who use them because it’s a part that you don’t see when the pen is assembled, and it saves them from having to make a sleeve themselves.

There are plenty of people who buy in ready made pen clips, irrespective of their experience, and there’s a mighty selection of them on the Beaufort Ink website. Without a decent level of metalworking skills, clips can let the side down quite badly if they’re made in the shed, but that said, there are also plenty who go on to learn the skills so that they can make clips themselves.

The point I’m making here is that everything you do in your custom pen journey is entirely your choice. As I’ve already said, it’s your hobby, your money, your time, your enjoyment and your sense of fulfilment -  the way you go about it now might not be the way you go about it in a year’s time in any case, so go about it now in a way that’s best for you. If you want to buy some parts to start with, and then develop your skills over time to make more of them yourself, that’s perfectly OK. If you decide that you’re quite happy sticking with that way of doing things long term, that’s also perfectly OK. And if you decide to make everything from scratch, right from the start, that’s perfectly OK too.

Custom pen making not only gives you freedom of design, it also gives you the freedom to make your own choices.


Tools & tooling

If you make pens from kits, or do any other kind of turning, you’ll already have some of the things you need in order to make custom pens, but you’re inevitably going to need a few specialist items too. If you’re resourceful you can often find a tooling solution in the early stages of your journey that will more or less do the job though, then you can invest in the proper thing or a better solution as your pen making evolves - you haven’t got to splash out on everything right at the start. Don’t let me stop you if that’s what you want to do, but unless you’re prepared to empty your coffers all in one go, it’s often best to buy what you need once you’ve decided that you have a need for it, rather than just in case you have a need for it. There are a few things that you’ll have to buy right from the word go, but I’ll go through a list of the major items and let you decide for yourself which ones are essential right from the start and which ones fall under the heading of “desirable”.

LATHE - A woodturning lathe is all you need to make custom pens, and if you’re reading this, you’ve more than likely already got one. An engineering lathe will certainly help with micro-accuracy and repeatability, particularly if it has a digital readout for tool positioning, but it is by no means essential. Just make sure that, irrespective of the type of lathe you have, it has a hollow spindle in the headstock and that it takes morse taper fittings, which will make it a far more versatile machine.

LATHE CHUCK - If you’ve got a lathe, you’ve more than likely got a chuck too. You’ll need one for turning square blanks round and for a myriad of other tasks. Whether full size or micro size, a lathe chuck is indispensable.
Versachuck modular wood lathe chuck system
Versachuck engineering micro-chuck system

DRILL CHUCK (JACOBS CHUCK) - Useful for drilling blanks on the lathe, possibly for holding thread taps, and also useful for work holding if you don’t have a collet chuck.
Keyless morse taper drill chucks

COLLET CHUCK & COLLET SET - A collet chuck will hold a range of collets in various diameters, which provide a very accurate, reliable and stable method of work holding, once the workpiece is round. They are available in various sizes, ER16, ER25, ER32, ER40 etc, which basically relate to the length of the collet. An ER32 chuck is possibly the most usable and versatile for custom pen making -  ER32 collects are available both in sets and individually in a great many diameters.
ER32 morse taper metric collet chuck set

TURNING TOOLS - The tools you’re already used to for cutting on a lathe will be good enough to get you started. As time goes on and your experience with custom pens increases, you might decide that others are desirable too, such as a very thin parting tool if you don’t already have one. You might also decide that you need to customise one or two tools on the grinder for specific applications.

LIVE CENTRE - If you have a lathe, you probably already have a live centre too. It’s fairly essential in many cases for supporting the workpiece from the tailstock end whilst being turned. Make sure it's a good quality live centre, which will help to eliminate run-out, and make sure that the cone isn't worn.
Morse taper lathe live centres

DEAD CENTRE - Useful if you want to turn between centres so that the workpiece can be driven from the headstock without the aid of a chuck.
Morse taper lathe dead centres

 
Some tools for custom pen making will be essential right from the start, and others will fall under the heading of "desirable"


CENTRE DRILL - Useful for making a pilot divot before using a drill bit, to help prevent the bit from skating or wandering before it engages with the surface of the workpiece.

DRILL BITS - You will need various drill bits, some of which will be in specialist sizes to accommodate specialist sizes of taps and dies.
Metric & imperial drill bits

TAILSTOCK TAP HOLDER - Thread taps can be held by hand, but it’s a fairly inaccurate way of doing it. They can also be held in a Jacobs chuck, which will involve the tailstock in travelling towards the headstock in order to advance the tap. A tailstock tap holder is an attachment that fits in the tailstock to support the thread tap and advance it whilst the thread is being cut. It saves the tailstock from having to travel in order to advance the tap, which given that there will always be an element of side to side play in a free moving tailstock, a tailstock tap holder is much more accurate.
Tailstock tap holders

TAILSTOCK DIE HOLDER - Thread dies can be held by hand, but it’s a fairly inaccurate way of doing it. A tailstock die holder is an attachment that fits in the tailstock to hold the die and advance it whilst the thread is being cut. In common with the tailstock die holder above, it saves the tailstock from having to travel in order to advance the die, which given that there will always be an element of side to side play in a free moving tailstock, a tailstock die holder is much more accurate.
Tailstock sliding die holder

THREAD TAPS & DIES FOR NIB HOUSINGS - These are specific to the size of fountain pen nib you decide to use.
Thread taps & dies for nib housings

THREAD TAPS & DIES FOR CONNECTOR THREADS - Typically M9 or M10, but the size you opt for will depend on the design of your pen.
Single lead thread taps & dies

THREAD TAPS & DIES FOR CAP THREADS - Triple lead threads are recommended - typically M12 or M13 to start out with, but the size you opt for will depend on the design of your pen.
Triple lead thread taps & dies

MANDRELS - Held in the headstock, most accurately by a collet chuck, but can also be held in a Jacobs chuck, they are specific to the threads on the workpiece you need to hold. They can be purchased for various applications or you can make them, and are used to locate the threaded part of a component so that you can work on the other end.
Threaded mandrels for custom pens

CALIPERS - Essential for measuring the diameter (and length) of the workpiece. Vernier calipers are ideal, preferably digital ones. The cheap versions from the supermarket “centre aisle” or available online are usually advertised as being accurate to /- 0.02mm, and if you're lucky they are. In my experience however, unless you really are lucky they're not, and the only way you'll know is if you buy an expensive "123 block" to test them, which more than obliterates any saving in buying cheap. The supermarket ones often don't zero when the jaws are closed, or there is sometimes even daylight visible through the closed jaws. They will be good enough to get you started if you are on a budget, but I recommend you invest in a decent set in the fullness of time.
Mitutoyo digital vernier calipers

DRAW BAR -  If unsupported by the tailstock, a morse taper attachment mounted in the headstock is prone to work itself loose whilst under power. A draw bar is a method of keeping the attachment seated by clamping it in place. It screws into a female thread that’s often present on the small end of the tapered arbor of the attachment, and presses on the revolving wheel or bearing that’s at the opposite end of the headstock spindle to the lathe bed. Since every lathe is different, a draw bar isn’t something you can generally buy, but they are simplicity itself to make. I’ve written a separate article on how to make one, which you might like to read if you’ve not come across them before.
How to make a lathe draw bar


  The Proverbial Postable Cap  
 

If the cap can be fitted to the finial  end of the barrel whilst the pen is in use, the cap is said to be postable - the cap can be posted on the barrel. If it can’t and has to stay on the desk, it’s non-postable.

So which is better? Hmmm - good question.

First of all, you’ll need to work out how to post the cap if that’s the route you’re going down. It can either be a push fit if you get your geometry right, or you could put a male thread on the end of the barrel or barrel finial, onto which the cap can be screwed. Try to avoid an unnecessary, long stalk behind any thread on a finial though, which is the lazy, frankly dated approach that many pen kits take, It’s a custom pen, so you don’t have to do it that way, and presumably you don’t want it to look like a Junior Gent.

If it’s going to be a simple push fit instead of a thread, which is arguably the neatest looking way of doing it, make sure that by posting the cap, neither the cap thread or the barrel are going to get damaged.

I’m afraid you’re always going to find someone who won’t buy your pen if it isn’t postable.  Don’t be too upset by it though - you can always get back in the workshop tomorrow and make sure the next one is postable, which surely will overcome the problem. Unfortunately though, it won’t, because now you’re going to find someone who won’t buy your pen precisely because it is postable, particularly if it does so via a thread.

It’s a dilemma you’re never going to overcome I’m afraid, unless you make both types. It’s far easier to make a pen with a non-postable cap, which, it has to be said, is the way most people go at first. You’re not going to sell a pen to every potential customer in any case, so my advice, certainly to start with, is to make your choice, just go with it and don’t worry.


Summary

As I said near the beginning, this article isn’t a blueprint for a pen design, nor does it discuss working methods and procedures, beyond a handful of what I hope are useful tips. I might in the future write an article or two to cover those aspects, but this one isn’t it. It is though, the bones of the very start of the process of conceiving a pen, choosing the right tools, and getting a blank on the lathe to begin your experiments, hone your skills and perfect your design.

There may well be elements that you might want to read through again, but I hope that the foregoing has been a bit helpful, and answered at least some of the questions that will undoubtedly have been going through your mind if you’ve been considering going down the road of making custom pens.

I’m sure there will be people reading this who think there should have been more pictures or that I should have made a YouTube video instead of a lot of heavy going writing, but I make no apologies for the format in which I’ve presented this. Distilled down, it's a lot of words to explain a very small number of key points - points that need to be considered before you commit even a pencil to paper to begin your design process, and points that in a written format can be referred to as often as you wish without searching through a long video to find the relevant information.

Remember above all else that making a custom pen, as I’ve mentioned more than once, gives you the freedom to create it exactly how you want. Do also remember though that apart from the practicalities of thread sizes, wall thicknesses and so on, there are a few aspects which if you intend to sell your pens, ought to be guiding your thinking to a greater or lesser extent, since you’ll need to consider the perceptions of the pen buying public. I’ve referred to them as the three big deal breakers, but they are buried within the context of what you’ve already read, so I’ll highlight them again here to save you hunting them down:
  • A big step up from the Section to the Barrel - you have no idea how the pen user will hold the pen, and a marked step between the two components can quite easily put off a potential buyer.
  • Too many twists to remove/replace the cap - pen owners want to be able to remove the cap quickly, with as few turns as possible. A triple lead thread overcomes this.
  • A cumbersome or badly balanced pen -  this is purely a subjective matter since one person’s idea of a well balanced pen may well differ from another’s, but aim to make the pen neither too bottom heavy and certainly not top heavy, nor ridiculously bulbous or cumbersome.
Don’t necessarily feel that you’ve got to complete a pen in its entirety right from the word go. Use an offcut to make a section, learn from the experience and make another one. Experiment with cap threads on offcuts, so that you can learn how differing treatments and lengths of thread will affect the way they connect together. Practice your drilling techniques so you can be sure that you drill completely straight, without any flaring of the hole (not as straightforward as it might seem - which if you’ve glued tubes into a blank before, you’ll already know).

Don’t be too upset or disappointed if your first attempt to make a complete pen doesn’t work out entirely as you’d hoped. The learning curve is fairly steep and it must be said that unless you’re an accomplished engineer (or even if you are) there are bound to be mishaps and errors along the way. Practice, practice, practice though, and if you have the motivation to do so, you will definitely get there.

Above all though, enjoy the journey. And do feel free to send in photos of your finished pens - it’s always good to see our customers’ progress and achievements.


Custome made fountain pen by Garcia Deschacht
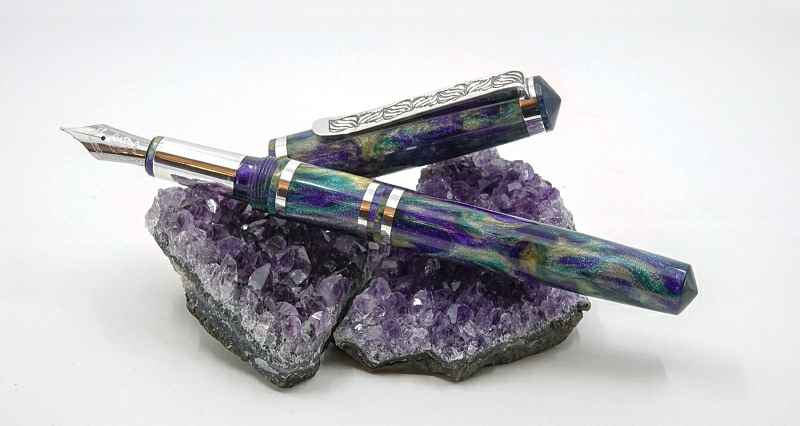
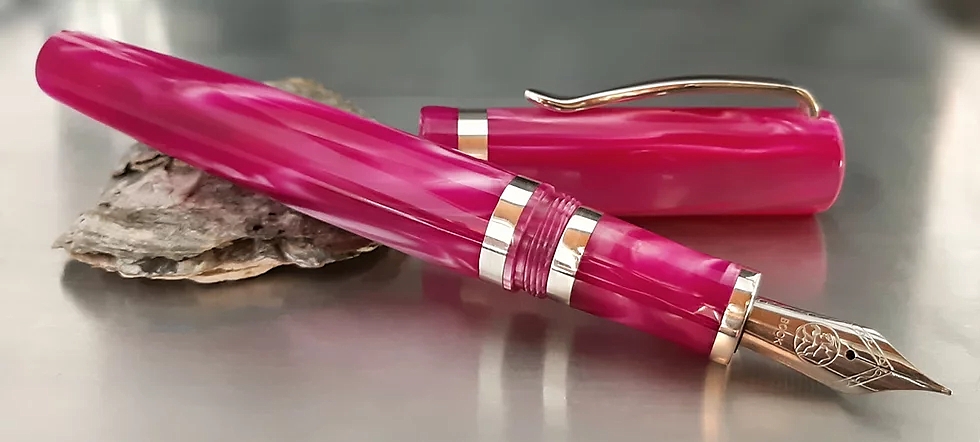
A custom pen by Garcia Deschact - Kirinte Magenta Pearl with sterling silver accents and Bock size 6 nib
Newsletter
Be the first to know about special offers, exciting new products and much more
Contact Us
01363 84686
[email protected]

Beaufort Ink
Great Wotton Cottage Studios
Colebrooke
Crediton
Devon
EX17 5DL
UK
 
Beaufort Ink is a trading name of Beaufort Ink Ltd
Company Registration No. 13302793
VAT Registration No. GB266698248

© Beaufort Ink
Ooops - something went wrong

Mailing List

Ooops -something went wrong

Please try again

Verify your email address

Verify your Email Address

Thanks for joining our mailing list

Please check your inbox
and verify your email address
to complete your subscription

Online - Start Chat?

Your name *


Cancel